前言
距上一次搭建树莓派平台已经两年了,保存的镜像出了问题,重新搭建一下。
系统
下载
从官网下载树莓派系统镜像,有以下几种可选
- Raspbian & Raspbian Lite,基于Debian
- Noobs & Noobs Lite
- Ubuntu MATE
- Snappy Ubuntu Core
- Windows 10 IOT
其余不太了解,之前安装的是Raspbian,对于Debian各种不适,换上界面优雅的Ubuntu Mate玩一下
老老实实玩Raspbian,笑脸:-)
安装
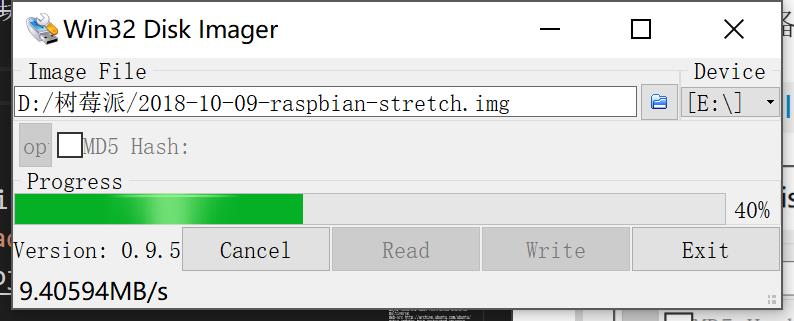
比较简单,准备micro-SD卡,用Win32 Disk Imager烧写镜像
安装完软件后可点击Read备份自己的镜像。
注意第二次开机前需要配置config.txt文件,否则hdmi无法显示
1 | disable_overscan=1 |
修改交换分区
Ubuntu Mate
查看交换分区
1 | $ free -m |
未设置时如下
1 | total used free shared buffers cached |
创建和挂载
1 | # 获取权限 |
查看交换分区
1 | $ free -m |
未设置时如下
1 | total used free shared buffers cached |
Raspbian
We will change the configuration in the file /etc/dphys-swapfile:
1 | $ sudo nano /etc/dphys-swapfile |
The default value in Raspbian is:
1 | CONF_SWAPSIZE=100 |
We will need to change this to:
1 | CONF_SWAPSIZE=1024 |
Then you will need to stop and start the service that manages the swapfile own Rasbian:
1 | $ sudo /etc/init.d/dphys-swapfile stop |
You can then verify the amount of memory + swap by issuing the following command:
1 | $ free -m |
The output should look like:
1 | total used free shared buffers cached |
软件
安装指令
-
apt-get- 安装软件
apt-get install softname1 softname2 softname3 ... - 卸载软件
apt-get remove softname1 softname2 softname3 ... - 卸载并清除配置
apt-get remove --purge softname1 - 更新软件信息数据库
apt-get update - 进行系统升级
apt-get upgrade - 搜索软件包
apt-cache search softname1 softname2 softname3 ... - 修正(依赖关系)安装:
apt-get -f insta
- 安装软件
-
dpkg-
安装
.deb软件包
dpkg -i xxx.deb -
删除软件包
dpkg -r xxx.deb -
连同配置文件一起删除
dpkg -r --purge xxx.deb -
查看软件包信息
dpkg -info xxx.deb -
查看文件拷贝详情
dpkg -L xxx.deb -
查看系统中已安装软件包信息
dpkg -l -
重新配置软件包
dpkg-reconfigure xx -
卸载软件包及其配置文件,但无法解决依赖关系!
sudo dpkg -p package_name -
卸载软件包及其配置文件与依赖关系包
sudo aptitude purge pkgname -
清除所有已删除包的残馀配置文件
dpkg -l |grep ^rc|awk '{print $2}' |sudo xargs dpkg -P
-
软件源
-
备份原始文件
1
$ sudo cp /etc/apt/sources.list /etc/apt/sources.list.backup
-
修改文件并添加国内源
1
$ vi /etc/apt/sources.list
-
注释元文件内的源并添加如下地址
1
2
3
4
5
6
7
8
9
10
11
12
13
14
15
16
17
18
19
20
21#Mirror.lupaworld.com 源更新服务器(浙江省杭州市双线服务器,网通同电信都可以用,亚洲地区官方更新服务器):
deb http://mirror.lupaworld.com/ubuntu gutsy main restricted universe multiverse
deb http://mirror.lupaworld.com/ubuntu gutsy-security main restricted universe multiverse
deb http://mirror.lupaworld.com/ubuntu gutsy-updates main restricted universe multiverse
deb http://mirror.lupaworld.com/ubuntu gutsy-backports main restricted universe multiverse
deb-src http://mirror.lupaworld.com/ubuntu gutsy main restricted universe multiverse
deb-src http://mirror.lupaworld.com/ubuntu gutsy-security main restricted universe multiverse
deb-src http://mirror.lupaworld.com/ubuntu gutsy-updates main restricted universe multiverse
deb-src http://mirror.lupaworld.com/ubuntu gutsy-backports main restricted universe multiverse
#Ubuntu 官方源
deb http://archive.ubuntu.com/ubuntu/ gutsy main restricted universe multiverse
deb http://archive.ubuntu.com/ubuntu/ gutsy-security main restricted universe multiverse
deb http://archive.ubuntu.com/ubuntu/ gutsy-updates main restricted universe multiverse
deb http://archive.ubuntu.com/ubuntu/ gutsy-proposed main restricted universe multiverse
deb http://archive.ubuntu.com/ubuntu/ gutsy-backports main restricted universe multiverse
deb-src http://archive.ubuntu.com/ubuntu/ gutsy main restricted universe multiverse
deb-src http://archive.ubuntu.com/ubuntu/ gutsy-security main restricted universe multiverse
deb-src http://archive.ubuntu.com/ubuntu/ gutsy-updates main restricted universe multiverse
deb-src http://archive.ubuntu.com/ubuntu/ gutsy-proposed main restricted universe multiverse
deb-src http://archive.ubuntu.com/ubuntu/ gutsy-backports main restricted universe multiverse或者
1
2
3
4
5
6
7
8
9
10
11
12
13
14
15
16
17
18
19
20
21
22
23#阿里云
deb http://mirrors.aliyun.com/ubuntu/ trusty main restricted universe multiverse
deb http://mirrors.aliyun.com/ubuntu/ trusty-security main restricted universe multiverse
deb http://mirrors.aliyun.com/ubuntu/ trusty-updates main restricted universe multiverse
deb http://mirrors.aliyun.com/ubuntu/ trusty-proposed main restricted universe multiverse
deb http://mirrors.aliyun.com/ubuntu/ trusty-backports main restricted universe multiverse
deb-src http://mirrors.aliyun.com/ubuntu/ trusty main restricted universe multiverse
deb-src http://mirrors.aliyun.com/ubuntu/ trusty-security main restricted universe multiverse
deb-src http://mirrors.aliyun.com/ubuntu/ trusty-updates main restricted universe multiverse
deb-src http://mirrors.aliyun.com/ubuntu/ trusty-proposed main restricted universe multiverse
deb-src http://mirrors.aliyun.com/ubuntu/ trusty-backports main restricted universe multiverse
#网易163
deb http://mirrors.163.com/ubuntu/ trusty main restricted universe multiverse
deb http://mirrors.163.com/ubuntu/ trusty-security main restricted universe multiverse
deb http://mirrors.163.com/ubuntu/ trusty-updates main restricted universe multiverse
deb http://mirrors.163.com/ubuntu/ trusty-proposed main restricted universe multiverse
deb http://mirrors.163.com/ubuntu/ trusty-backports main restricted universe multiverse
deb-src http://mirrors.163.com/ubuntu/ trusty main restricted universe multiverse
deb-src http://mirrors.163.com/ubuntu/ trusty-security main restricted universe multiverse
deb-src http://mirrors.163.com/ubuntu/ trusty-updates main restricted universe multiverse
deb-src http://mirrors.163.com/ubuntu/ trusty-proposed main restricted universe multiverse
deb-src http://mirrors.163.com/ubuntu/ trusty-backports main restricted universe multiverse -
放置非官方源的包不完整,可在为不添加官方源
1
deb http://archive.ubuntu.org.cn/ubuntu-cn/ feisty main restricted universe multiverse
-
更新源
1
$ sudo apt-get update
-
更新软件
1
$ sudo apt-get dist-upgrade
-
常见的修复安装命令
1
$ sudo apt-get -f install
Python
主要是Python和相关依赖包的安装,使用以下指令可导出已安装的依赖包
1 | $ pip freeze > requirements.txt |
并使用指令安装到树莓派
1 | $ pip install -r requirements.txt |
注意pip更新
1 | python -m pip install --upgrade pip |
最新版本会报错
1 | ImportError: cannot import name main |
修改文件/usr/bin/pip
1 | from pip import main |
改为
1 | from pip import __main__ |
成功!!!
失败了,笑脸:-),手动安装吧。。。
-
部分包可使用
pip31
2
3$ pip3 install numpy
$ pip3 install pandas
$ pip3 install sklearn若需要权限,加入
--user -
部分包用
apt-get,但是优先安装到Python2.7版本,笑脸:-)1
2
3$ sudo apt-get install python-scipy
$ sudo apt-get install python-matplotlib
$ sudo apt-get install python-opencv -
部分从
PIPY下载.whl或.tar.gz文件PyPI – the Python Package Index · PyPI
- tensorboardX-1.4-py2.py3-none-any.whl
- visdom-0.1.8.5.tar.gz
安装指令为
1
$ pip3 install xxx.whl
1
2$ tar -zxvf xxx.tar.gz
$ python setup.py install -
Pytorch源码安装pytorch/pytorch: Tensors and Dynamic neural networks in Python with strong GPU acceleration
安装方法Installation - From Source
需要用到
miniconda,安装方法如下,注意中间回车按慢一点,有两次输入。。。。。(行我慢慢看条款不行么。。笑脸:-))- 第一次是是否同意条款,
yes - 第二次是添加到环境变量,
yes,否则自己修改/home/pi/.bashrc添加到环境变量
1
2
3
4
5
6
7
8
9
10
11$ wget http://repo.continuum.io/miniconda/Miniconda3-latest-Linux-armv7l.sh
$ sudo md5sum Miniconda3-latest-Linux-armv7l.sh # (optional) check md5
$ sudo /bin/bash Miniconda3-latest-Linux-armv7l.sh
# -> change default directory to /home/pi/miniconda3
$ sudo nano /home/pi/.bashrc
# -> add: export PATH="/home/pi/miniconda3/bin:$PATH"
$ sudo reboot -h now
$ conda
$ python --version
$ sudo chown -R pi miniconda3然后就可以安装了没有对应版本的mkl,笑脸:-)1
2
3
4
5
6
7
8
9
10
11
12
13export CMAKE_PREFIX_PATH="$(dirname $(which conda))/../" # [anaconda root directory]
# Disable CUDA
export NO_CUDA=1
# Install basic dependencies
conda install numpy pyyaml mkl mkl-include setuptools cmake cffi typing
conda install -c mingfeima mkldnn
# Install Pytorch
git clone --recursive https://github.com/pytorch/pytorch
cd pytorch
python setup.py install - 第一次是是否同意条款,
-
tensorflow
安装tensorflow需要的一些依赖和工具1
2
3
4
5
6
7$ sudo apt-get update
# For Python 2.7
$ sudo apt-get install python-pip python-dev
# For Python 3.3+
$ sudo apt-get install python3-pip python3-dev安装
tensorflow若下载失败,手动打开下面网页下载
.whl包1
2
3
4
5
6
7# For Python 2.7
$ wget https://github.com/samjabrahams/tensorflow-on-raspberry-pi/releases/download/v1.1.0/tensorflow-1.1.0-cp27-none-linux_armv7l.whl
$ sudo pip install tensorflow-1.1.0-cp27-none-linux_armv7l.whl
# For Python 3.4
$ wget https://github.com/samjabrahams/tensorflow-on-raspberry-pi/releases/download/v1.1.0/tensorflow-1.1.0-cp34-cp34m-linux_armv7l.whl
$ sudo pip3 install tensorflow-1.1.0-cp34-cp34m-linux_armv7l.whl卸载,重装mock
1
2
3
4
5
6
7# For Python 2.7
$ sudo pip uninstall mock
$ sudo pip install mock
# For Python 3.3+
$ sudo pip3 uninstall mock
$ sudo pip3 install mock安装的版本
tensorflow v1.1.0没有models,因为1.0版本以后models就被Sam Abrahams独立出来了,例如classify_image.py就在models/tutorials/image/imagenet/里
其余
-
输入法
1
2
$ sudo apt-get install fcitx fcitx-googlepinyin
$ fcitx-module-cloudpinyin fcitx-sunpinyin -
git1
$ sudo apt-get install git
配置
git和ssh1
2
3
4
5$ git config --global user.name "Louis Hsu"
$ git config --global user.email is.louishsu@foxmail.com
$ ssh-keygen -t rsa -C "is.louishsu@foxmail.com"
$ cat ~/.ssh/id_rsa.pub # 添加到github


